You can easily convert float color list (i.e. used in Kivy [1]) to Web RGB in Python [2] with oneliner:
c = [0.5019607843137255, 0.796078431372549, 0.7686274509803922, 1.0]
rgb = '#%02X%02X%02X%02X' % tuple(int(255*i) for i in c)
'#80CBC4FF'
You can easily convert float color list (i.e. used in Kivy [1]) to Web RGB in Python [2] with oneliner:
c = [0.5019607843137255, 0.796078431372549, 0.7686274509803922, 1.0] rgb = '#%02X%02X%02X%02X' % tuple(int(255*i) for i in c) '#80CBC4FF'
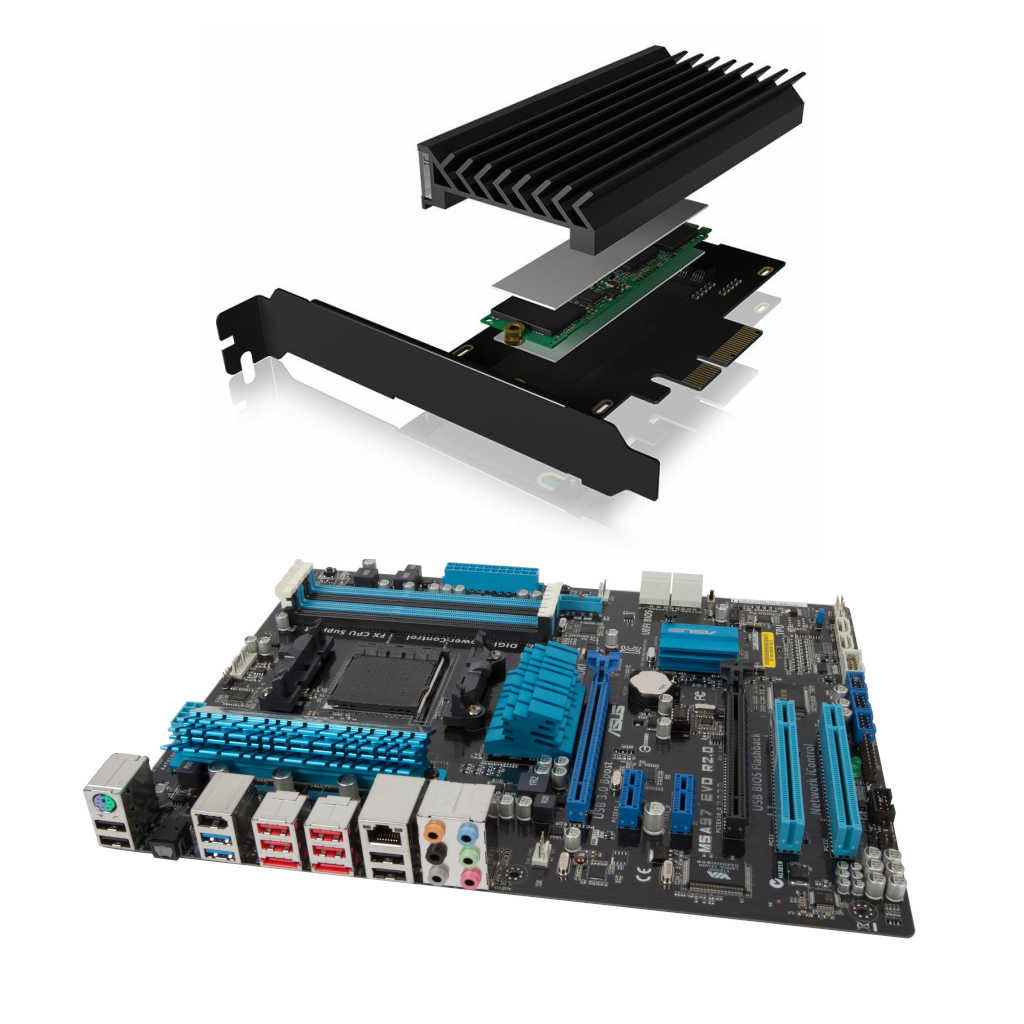
Modern laptops are quite expensive and hard to upgrade. While they are really handy to work in multiple places, they are not that efficient for advanced R&D activities like virtualization and massive software development combined (I/O speeds highly affects overall performance and compilation times). I was wondering if M2.NVM disk over PCI-E controller could work with my old desktop workstation giving additional performance benefit over standard onboard SATA attached SSD drive.
Old desktop PC only supports SATA drives. Switching to SATA SSD (electronics NAND Flash based Solid State Drive) in place of conventional HDD (mechanical drive) can boost I/O performance noticeably. We had 3.5″ (desktop) and 2.5″ (laptop) physical disk dimensions available so far. But new M2 SSD drives showed up, founding a new standard, with smaller form factor to be installed in embedded systems and lightweight laptops. M2 defines only a physical dimensions requirements, while disk itself can implement SATA (with average 500MB/s read/write speed) or NVM (with average 3000MB/s read/write speeds or better) interface.
So I have decided to try M2.NVM Samsung SSD 980 1TB drive over ICYBOX IB-PCI224M2-ARGB PCI-E 4.0 controller on my ASUS M5A97 R2.0 (last available BIOS 2603) that only supports PCI-E 2.0. I have several internal and external SSD SATA drives both in 2.5″ and M2 form factor. Having even basic M2.NVM drive over PCI-E controller seems to be more future proof purchase, for the same amount of money, it will be ready for possible motherboard replacement, and in bay benefit in additional performance gain over onboard SATA attached SSD drive. Operating system is Open-Source FreeBSD Unix version 13-STABLE, filesystem is ZFS (testing done with no compression and no encryption).
It turns out that PCI-E 4.0 card can work on older PCI-E 2.0 bus (for sure speed will be degraded in that case). Mainboard BIOS does not see the NVM controlleri in UEFI mode (TODO) so it is not possible to boot out of it without additional SATA drive with the FreeBSD bootloader / kernel first (TODO). FreeBSD can see and utilize both PCI-E Controller and the M2.NVM drive with no problem. Let’s see the data transfer speed results in numbers.
Average in-filesystem StressDisk large file write speed results:
DiskInfo single drive summary results:
As we can see above, from user perspective in out-of-the-box configuration write speeds are 218% faster on NVM SDD over HDD RAID for large files (this may need some filesystem tuning). Weighted average disk access for NVM SSD is 1 115 693 KB/s, WD20EFRX is 111 176 KB/s, WDEARS is 83 521 KB/s. It turns out that WD RED HDD disks are 133% faster than WD GREEN HDD disks, while NVM SSD disks are over 1000% faster than WD HDD RED disks. On the other hand external USB 3.1 M2.SATA SSD disk has average 47 626 KB/s results. One last but crucial test will be added here containing the onboard SATA SSD drive, just to make sure and prove NVM dominance over SATA.
DiskInfo result for single 3.5″ 2TB 5400RPM HDD WDEARS (GREEN Series) drive attached to onboard SATA controller:
# diskinfo -tv /dev/ada2
/dev/ada2
        512             # sectorsize
        2000398934016   # mediasize in bytes (1.8T)
        3907029168      # mediasize in sectors
        4096            # stripesize
        0               # stripeoffset
        3876021         # Cylinders according to firmware.
        16              # Heads according to firmware.
        63              # Sectors according to firmware.
        WDC WD20EARS-00MVWB0    # Disk descr.
        XXX             # Disk ident.
        ahcich4         # Attachment
        No              # TRIM/UNMAP support
        Unknown         # Rotation rate in RPM
        Not_Zoned       # Zone Mode

Seek times:
        Full stroke:      250 iter in   7.135585 sec =   28.542 msec
        Half stroke:      250 iter in   5.288793 sec =   21.155 msec
        Quarter stroke:   500 iter in   7.540787 sec =   15.082 msec
        Short forward:    400 iter in   3.036829 sec =    7.592 msec
        Short backward:   400 iter in   2.956946 sec =    7.392 msec
        Seq outer:       2048 iter in   0.254515 sec =    0.124 msec
        Seq inner:       2048 iter in   0.199511 sec =    0.097 msec

Transfer rates:
        outside:       102400 kbytes in   0.899735 sec =   113811 kbytes/sec
        middle:        102400 kbytes in   1.169709 sec =    87543 kbytes/sec
        inside:        102400 kbytes in   2.080911 sec =    49209 kbytes/sec
DiskInfo result for single 3.5″ 2TB 5400RPM HDD WD20EFRX (RED Series) drive attached to onboard SATA controller:
# diskinfo -tv /dev/ada0
/dev/ada0
        512             # sectorsize
        2000398934016   # mediasize in bytes (1.8T)
        3907029168      # mediasize in sectors
        4096            # stripesize
        0               # stripeoffset
        3876021         # Cylinders according to firmware.
        16              # Heads according to firmware.
        63              # Sectors according to firmware.
        WDC WD20EFRX-68EUZN0    # Disk descr.
        XXX             # Disk ident.
        ahcich0         # Attachment
        No              # TRIM/UNMAP support
        5400            # Rotation rate in RPM
        Not_Zoned       # Zone Mode

Seek times:
        Full stroke:      250 iter in   6.653120 sec =   26.612 msec
        Half stroke:      250 iter in   5.172312 sec =   20.689 msec
        Quarter stroke:   500 iter in   7.808667 sec =   15.617 msec
        Short forward:    400 iter in   2.082164 sec =    5.205 msec
        Short backward:   400 iter in   3.350534 sec =    8.376 msec
        Seq outer:       2048 iter in   0.141464 sec =    0.069 msec
        Seq inner:       2048 iter in   0.139262 sec =    0.068 msec

Transfer rates:
        outside:       102400 kbytes in   0.698874 sec =   146521 kbytes/sec
        middle:        102400 kbytes in   0.876360 sec =   116847 kbytes/sec
        inside:        102400 kbytes in   1.459537 sec =    70159 kbytes/sec
DiskInfo result for single M2.NVM Samsung SSD 980 1TB drive attached to ICYBOX IB-PCI224M2-ARGB PCI-E 4.0 controller working on PCI-E 2.0 capable motherboard:
# diskinfo -tv /dev/nvd0
/dev/nvd0
        512             # sectorsize
        1000204886016   # mediasize in bytes (932G)
        1953525168      # mediasize in sectors
        4096            # stripesize
        0               # stripeoffset
        Samsung SSD 980 1TB     # Disk descr.
        XXX             # Disk ident.
        nvme0           # Attachment
        Yes             # TRIM/UNMAP support
        0               # Rotation rate in RPM

Seek times:
        Full stroke:      250 iter in   0.008369 sec =    0.033 msec
        Half stroke:      250 iter in   0.005510 sec =    0.022 msec
        Quarter stroke:   500 iter in   0.014519 sec =    0.029 msec
        Short forward:    400 iter in   0.010368 sec =    0.026 msec
        Short backward:   400 iter in   0.020456 sec =    0.051 msec
        Seq outer:       2048 iter in   0.032788 sec =    0.016 msec
        Seq inner:       2048 iter in   0.032863 sec =    0.016 msec

Transfer rates:
        outside:       102400 kbytes in   0.094156 sec =  1087557 kbytes/sec
        middle:        102400 kbytes in   0.093168 sec =  1099090 kbytes/sec
        inside:        102400 kbytes in   0.088243 sec =  1160432 kbytes/sec
DiskInfo resuls for USB 3.1 M2.SATA SSD disk enclosure:
 # diskinfo -tv /dev/da0
/dev/da0
        512             # sectorsize
        256060514304    # mediasize in bytes (238G)
        500118192       # mediasize in sectors
        4096            # stripesize
        0               # stripeoffset
        31130           # Cylinders according to firmware.
        255             # Heads according to firmware.
        63              # Sectors according to firmware.
        USB3.1          # Disk descr.
        XXX             # Disk ident.
        umass-sim0      # Attachment
        No              # TRIM/UNMAP support
        Unknown         # Rotation rate in RPM
        Not_Zoned       # Zone Mode

Seek times:
        Full stroke:      250 iter in   0.096377 sec =    0.386 msec
        Half stroke:      250 iter in   0.099408 sec =    0.398 msec
        Quarter stroke:   500 iter in   0.216023 sec =    0.432 msec
        Short forward:    400 iter in   0.190744 sec =    0.477 msec
        Short backward:   400 iter in   0.203053 sec =    0.508 msec
        Seq outer:       2048 iter in   0.769551 sec =    0.376 msec
        Seq inner:       2048 iter in   0.769675 sec =    0.376 msec

Transfer rates:
        outside:       102400 kbytes in   3.250481 sec =    31503 kbytes/sec
        middle:        102400 kbytes in   3.215029 sec =    31850 kbytes/sec
        inside:        102400 kbytes in   3.210055 sec =    31900 kbytes/sec
If you are using UFS you can remount the root while in single mode with
mount -u w /
If you are using ZFS you can remount the root while in single mode with
zfs set readonly=off zroot
Note: With ZFS there is no need to turn back readonly=on as this will keep read-only flag while in userland mode :-)
If you encounter a problem with microphone in Chromium on FreeBSD (and other *BSD), this is because it uses sndio audio backend and probably default microphone is not the one you want to use. In my case /dev/dsp0 is the HDMI input/output thus no audio input. There is no need to start system wide sndiod. You can use environment variables in ~/.profile to control audio input/output for the local spawning sndio client:
export AUDIODEVICE="rsnd/4" sets default input/output device to /dev/dsp4.export AUDIORECDEVICE="rsnd/3" sets default input device to /dev/dsp3.export AUDIOPLAYDEVICE="rsnd/2" sets default output device to /dev/dsp2.You can simply set AUDIODEVICE="rsnd/4" to switch default input and output device, and/or AUDIORECDEVICE="rsnd/3" to change default microphone source. If you want to have choice to switch between several devices on the fly you will need to use sndiod and provide set of devices with -f flag. See sndio [1] and sndiod [2] man pages for more information.
[1] https://man.openbsd.org/sndio.
[2] https://man.openbsd.org/sndiod
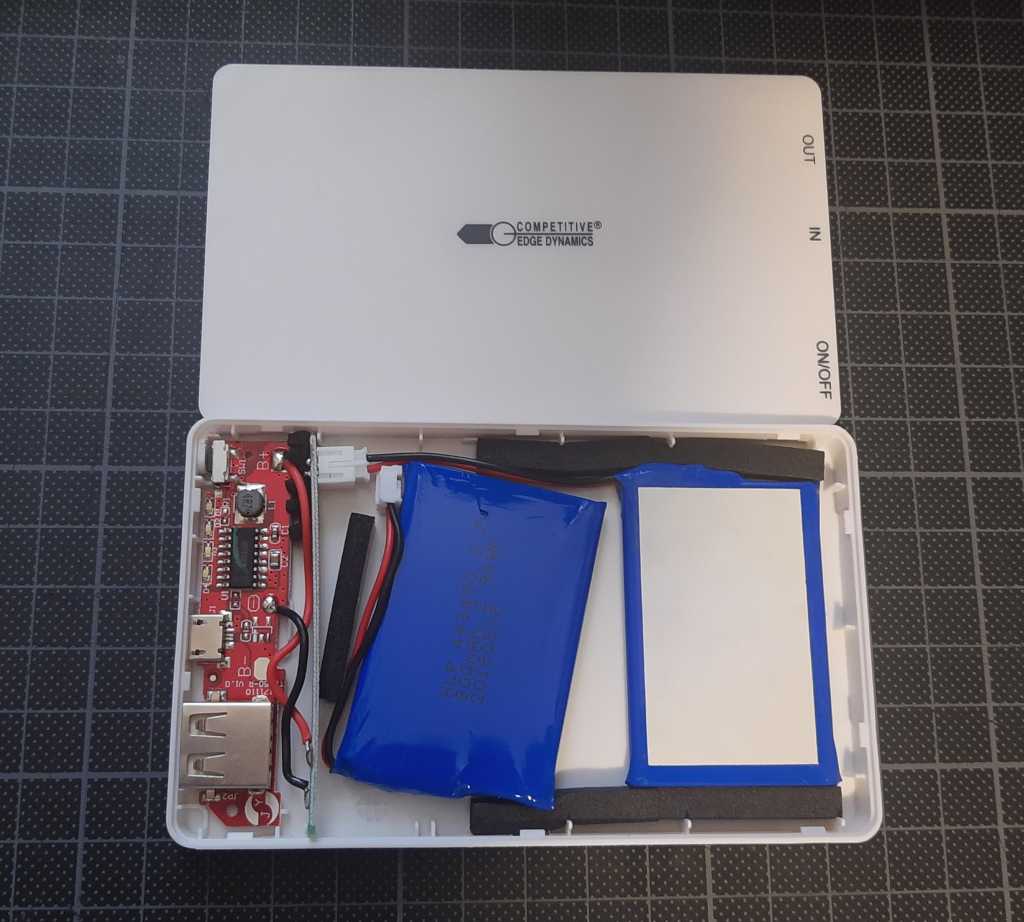
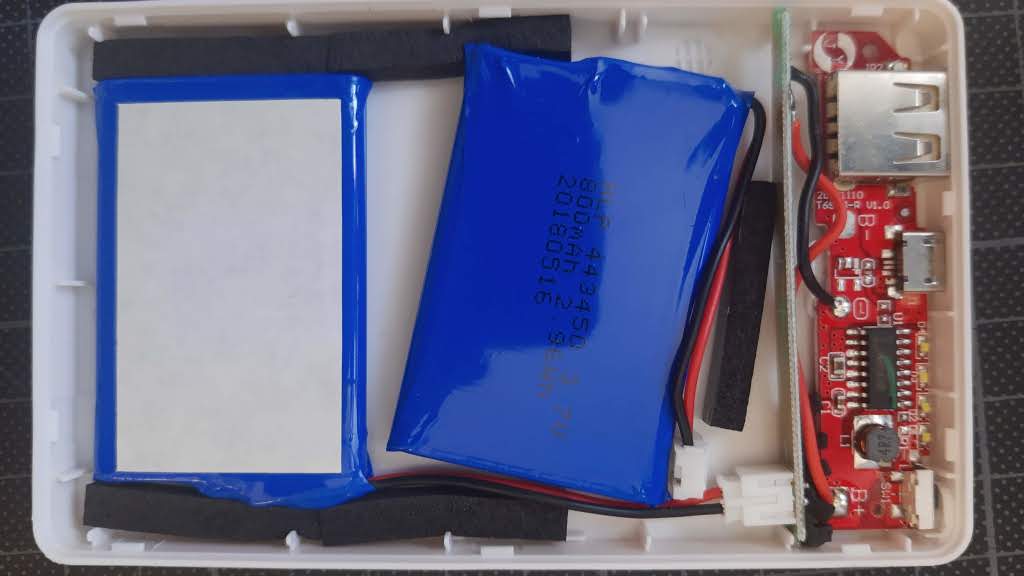
If you need to replace battery for CED 7000 timer [1] you can either buy a HLP 443450 3.7V 800mAh 2.96Wh accumulator [2] or dedicated inexpensive Power Bank [3] that contains two accumulators inside – one for quick replacement of the timer battery and the other to charge timer over the USB cable – this way you can also safely carry a backup and replacement power source at hand :-) One thing that could be improved here is using both accumulators in the Power Bank so capacity is doubled and both are always charged – that should also prevent self-discharge below safe point of the unused unit.
With this trick you can make your PDF smaller even 10x with no noticable picture quality loss :-)
gs -sDEVICE=pdfwrite -dCompatibilityLevel=1.4 -dPDFSETTINGS=/screen -dNOPAUSE -dBATCH -dQUIET -dDownsampleColorImages=true -dColorImageResolution=200 -dColorImageDownsampleType=/Bicubic -sOutputFile=output.pdf input.pdf
If you work with Xilnx Vivado Design Suite [1] for FPGA development using USB JTAG interface such as Xilinx USB Platform Cable [2] or its cheaper clone from WaveShare [3], everything seems to be connected properly, but it cannot find the Target for programming, you probably need to perform drivers setup manually [4]. Error message looks like this:
ERROR: [Labtoolstcl 44-494] There is no active target available for server at localhost.
Targets(s) ", jsn3" may be locked by another hw_server.
Error message may indicate that another instance of hw_server is running in the background but that is not the case. Check your drivers first [4]. Some hints:
Vivado/2020.2/data/xicom/cable_drivers/lin64/install_script/install_drivers.pcusb./etc/udev/rules.d/ (i.e. 52-xilinx-pcusb.rules file).service udev restart command and re-attach your USB JTAG cable.[1] https://www.xilinx.com/products/design-tools/vivado.html
[2] https://www.xilinx.com/products/boards-and-kits/hw-usb-ii-g.html
[3] https://www.waveshare.com/platform-cable-usb.htm
[4] https://www.xilinx.com/support/answers/54381.html
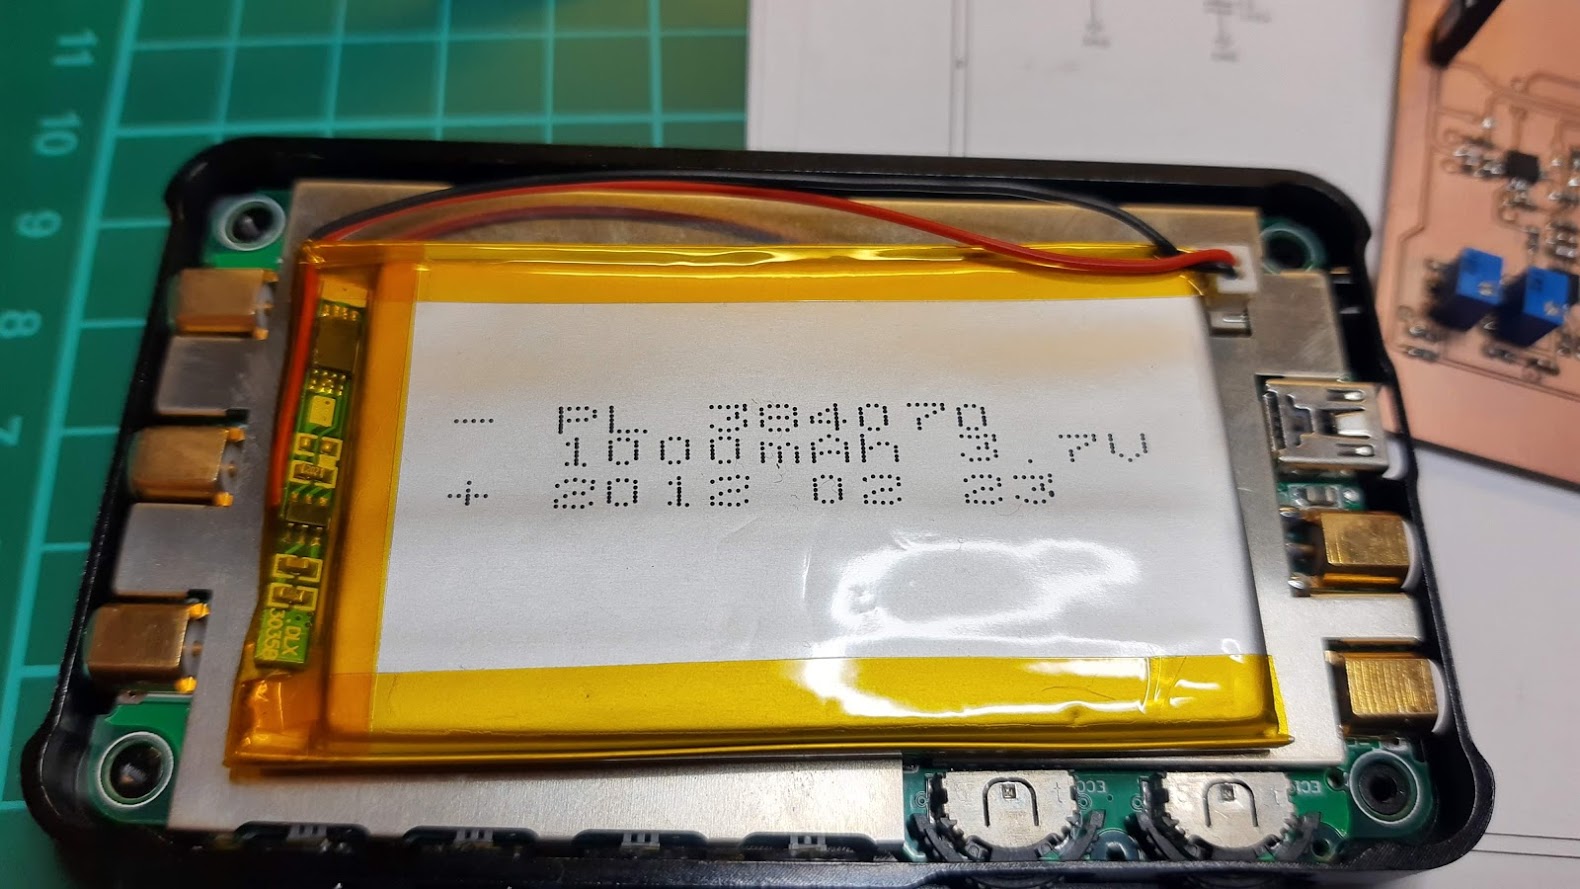
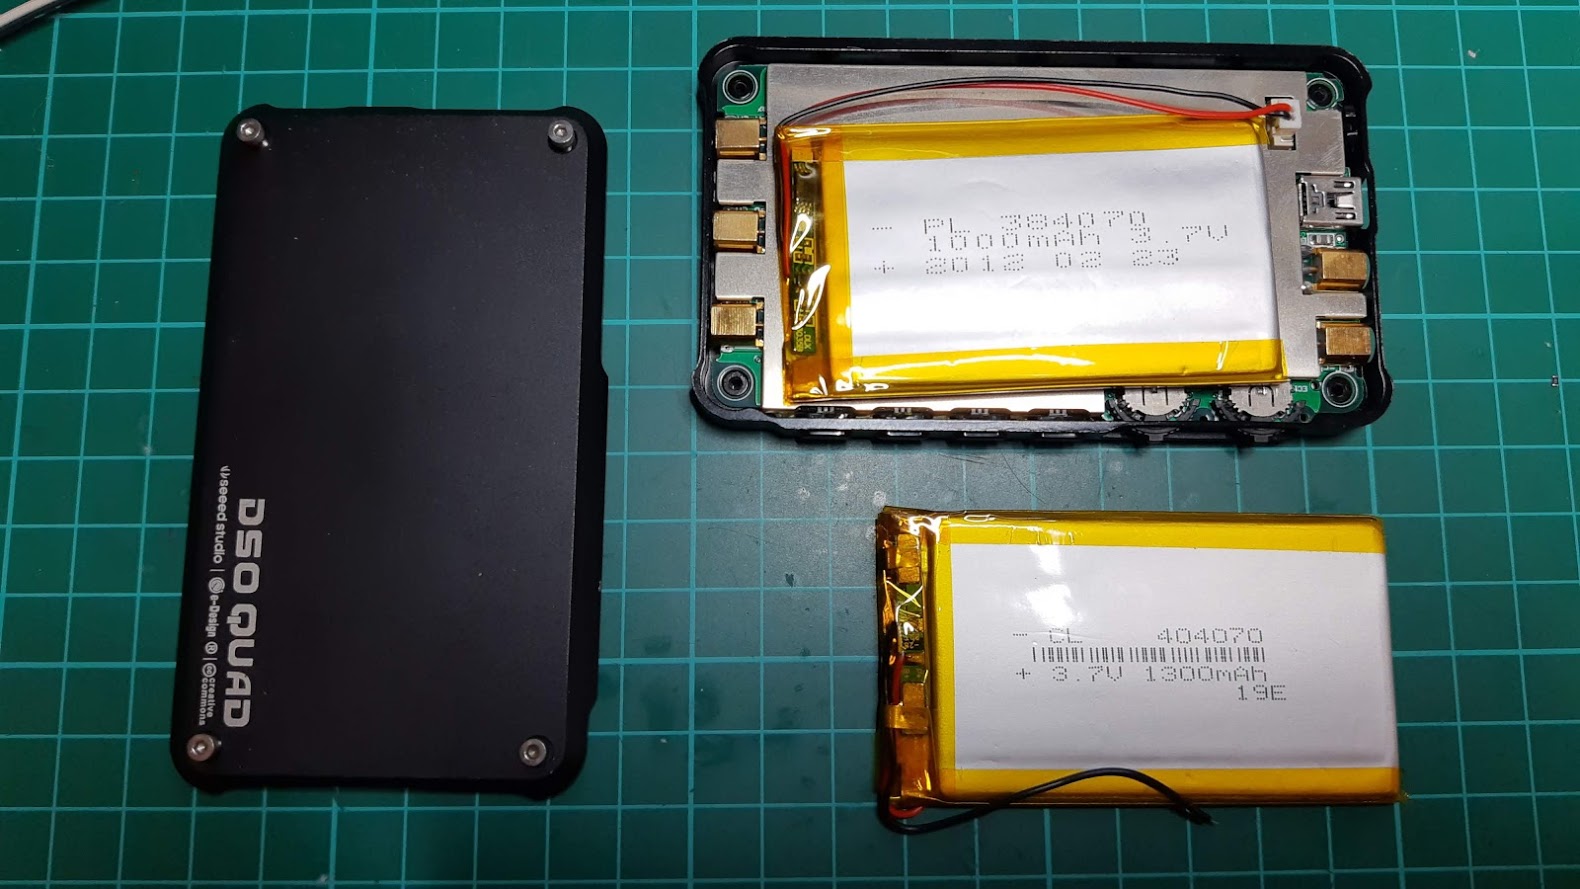
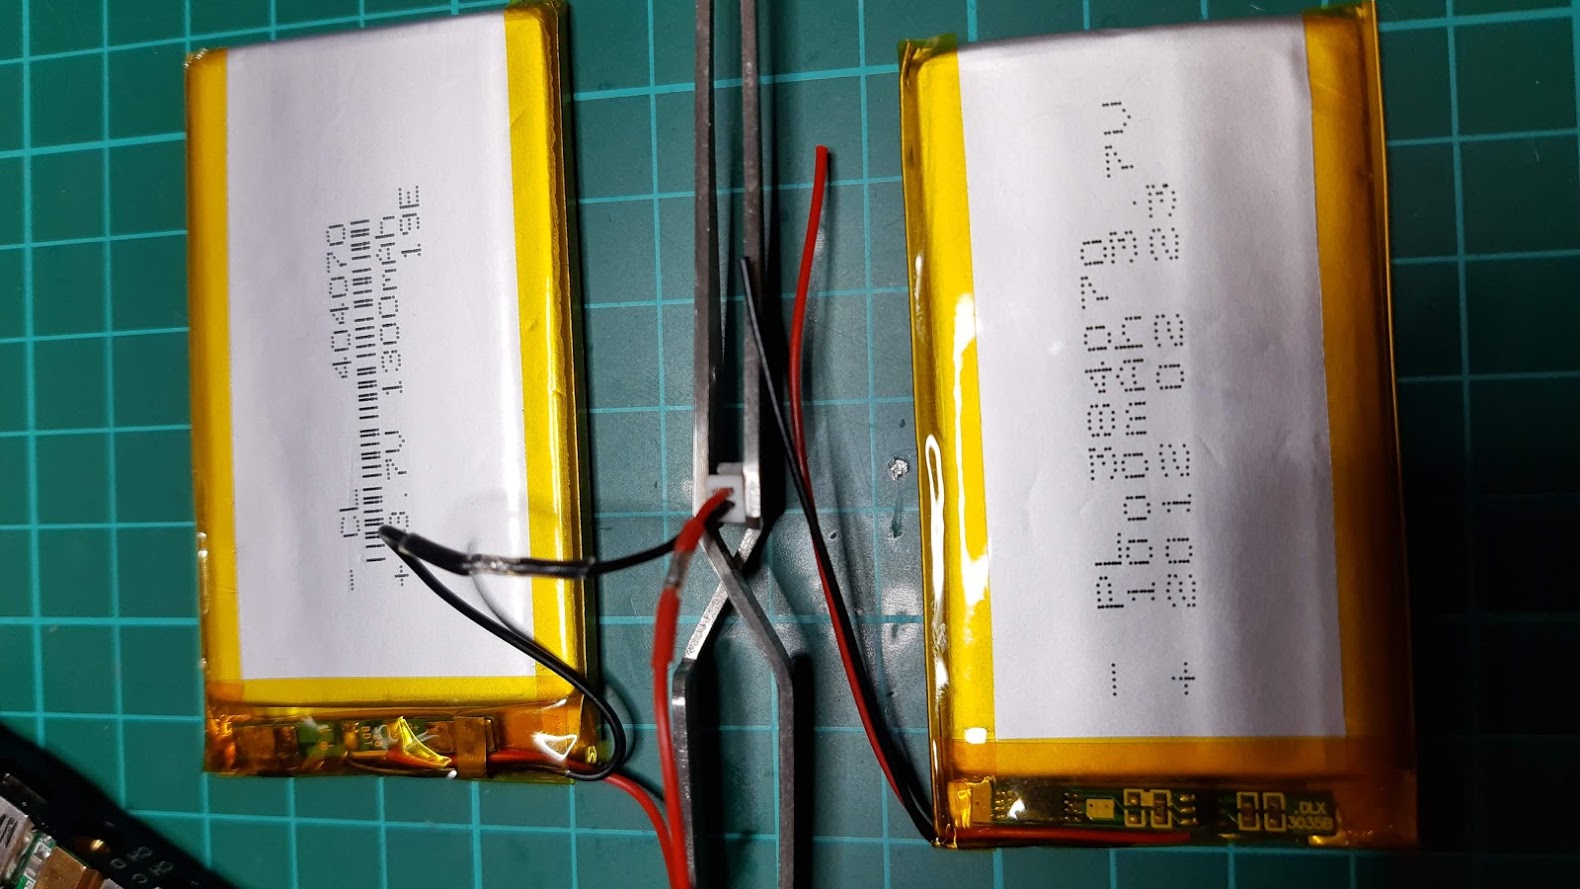
If you are happy user of DSO QUAD pocket oscilloscope from Seeed Studio [1] then probably after all those years you need to replace the accumulator. Because stock model PL384070 3.7V 1000mAh is not available anymore you can safely use CL404070 3.7V 1300mAh that is only 0.2mm thicker but it also fits the scope very well and you gain 30% capacity. You only have to solder the plug from the old accumulator. Enjoy :-)
This wulf7 [1] is a really nice guy that helped me run full featured Synaptics TouchPad with FreeBSD on Panasonic Toughbook CF-MX4 [2][3]. Now it works for moused and libinput with all multitouch gestures like two or three finger scroll, scale, etc! The problem was in detection mechanism as device is connected over multiplexer with both PS/2 and SMBus but multitouch works only over SMBus. Although fix requires change and rebuild of FreeBSD Kernel I hope it gets quickly to the upstream [4]. I had a chance to exercise building whole FreeBSD distribution into the USB memstick image, so I could test driver fix on a target computer without even touching its hard drive contents :-)
/* psm has a special support for GenMouse + SynTouchpad combination */
if (active_ports_count >= 2) {
    for (port = 0; port < KBDC_AUX_MUX_NUM_PORTS; port++) {
That 2 above had to be changed into 1 in /usr/src/sys/dev/atkbdc/psm.c. Nice? That’s what I call a one-bit-fix :-)
In addition, when you work with Synaptics Touchpad in Xorg and you want to use its all features like tap-to-click, natural (swapped) two finger scroll, two and three finger gestures, don’t use moused,xmodmap, or xinput as this will produce inconsistent behavior in applications based on different toolkits (i.e. GTK will scroll up while Qt will scroll down etc), instead use the new way of input based on libinput and modify MatchIsTouchpad section of /usr/local/share/X11/xorg.conf.d/40-libinput.conf like:
Section "InputClass"
        Identifier "libinput touchpad catchall"
        MatchIsTouchpad "on"
        MatchDevicePath "/dev/input/event5"
        Option "NaturalScrolling" "on"
        Option "Tapping" "on"
        Option "ClickMethod" "clickfinger"
        Driver "libinput"
EndSection
[1] https://github.com/wulf7/iichid
[2] https://github.com/wulf7/iichid/issues/51
[3] https://github.com/wulf7/iichid/issues/53
[4] https://reviews.freebsd.org/D28502
You can disable comments for existing posts using Bulk Edit, but this is not possible for existing media files. You can do both with a single SQL command :
UPDATE wp_your_table_with_posts SET comment_status = 'closed';
You can disable comments for all new posts either by hand as administrator unchecking Settings / Discussion / Allow people to submit comments on new posts, or using SQL command:
UPDATE wp_your_table_with_options SET option_value = NULL WHERE option_name = 'default_comment_status';
If you have Panasonic Toughbook laptop with no LTE/4G cellular modem and after you attach internal modem but it is still not visible in BIOS Setup nor in the Operating System, go to the Main / Optional Kit Configuration, use toughkit password, then set Wireless WAN ID = 15 (in case you use original Sierra Wireless EC7305 device). WWAN card should be now available both in BIOS Setup and Operating System USB port. Enjoy! :-)
If you encounter turtle slow Windows 10 boot time on a decent machine it may be caused by AMD/Radeon driver’s ULPS. Try the following:
1. Launch REGEDIT.
2. Search for “enableulps” key.
3. Set its value from 1 to 0.
4. Reboot and see if that helped :-)
If you need to perform a data recovery from an external ZFS [zfs] volume you may find those hinds helpful:
geli attach /dev/your_device_partition
/mnt/zfs):
zpool import -af -R /mnt/zfs
none what marks it as no mount (note this mountpoint will append to parent mount point location):
zfs set mountpoint=ROOT zroot/ROOT/default
zfs mount -a
zfs umount -a
zfs mount zroot/ROOT/default
zpool status
zfs list
If you encounter lots of CAM/CRC errors when using encrypted ZFS on some SSD drives on FreeBSD, that is caused by TRIM. You need to disable it in boot loader prompt or add below line to /boot/loader.conf:
vfs.zfs.trim.enabled=0
If you encounter any strange network related behavior on a windows based pc, especially after windows update, use this to resolve most of the problems and save some time, remember to reboot pc afterwards ;-)
netsh winsock reset
SoundFlower [1] is amazing Free and Open-Source extension to macOS BSD that allows you to create Virtual Audio Device in order to Route and Record Applications Audio. This is especially important for activities like Online Streaming and Presentation/Lectures Recording.
If you need more advanced Audio Routing with a nice GUI and lots of options try Loopback [2] from RogueAmoeba [3].
Thank you for this amazing fork and keeping it Open-Source! :-)
[1] https://github.com/mattingalls/Soundflower
[2] https://rogueamoeba.com
[3] https://rogueamoeba.com/loopback
If you want GRUB to remember your last choice add:
GRUB_DEFAULT=saved
GRUB_SAVEDEFAULT=true
to
/etc/default/grub and run sudo update-grub to apply new configuration.
If you encounter a problem with running Python [python] scripts on a “bare” Blender Player [blender], make sure that both PYTHONHOME and PYTHONPATH are set correctly to match your needs. You can also use native Blender python with a simple shell script:
#!/bin/sh
export PYTHONHOME="/path/to/blender/python/"
export PYTHONPATH=$PYTHONHOME"/bin"
/path/to/your/blenderplayer $@
[python] https://www.python.org/
[blender] https://www.blender.org/
In case you need to separate a filename from an extension in bash here is a way:
filename=$(basename -- "$fullfile")
extension="${filename##*.}"
filename="${filename%.*}"
If you want to move a business from Microsoft Office365 to Google Suite, there is a nice migration utility in Google Suite Admin Console that helps you transfer all accounts data from Exchange Web Server or IMAP.
In case you encounter an error here goes a list of error codes and troubleshooting guide [1].
I did a full migration by granting my temporary user Global Administrator right by current Admin user, then in Exchange Admin Console I had to grant myself an ApplicationImpersonation Admin Role (to access other accounts for migration). After the migration was complete I have rolled back my permissions to a minimum level.
[1] https://support.google.com/a/answer/6254288
Sometimes you need to quickly create a hexeditor like dump of a binary file. HEXDUMP is your friend. It may be a standard Unix application or Python module.
Unix hexdump use example:
hexdump -Cv file.bin
00000000  12 01 00 02 ef 02 01 40  28 0d 04 02 00 10 01 02  |.......@(.......|
00000010  03 01 12 01 00 02 ef 02  01 40 28 0d 04 02 00 10  |.........@(.....|
00000020  01 02 03 01 09 02 82 00  04 01 00 80 fa 09 02 82  |................|
00000030  00 04 01 00 80 fa 09 04  00 00 02 08 06 50 07 07  |.............P..|
00000040  05 82 02 40 00 00 07 05  02 02 40 00 00 09 04 03  |...@......@.....|
00000050  00 02 03 00 00 06 09 21  00 01 00 01 22 21 00 07  |.......!...."!..|
00000060  05 81 03 40 00 01 07 05  01 03 40 00 01 08 0b 01  |...@......@.....|
00000070  02 02 02 01 04 09 04 01  00 01 02 02 01 04 05 24  |...............$|
00000080  00 10 01 05 24 01 03 02  04 24 02 06 05 24 06 01  |....$....$...$..|
00000090  02 07 05 83 03 10 00 20  09 04 02 00 02 0a 00 00  |....... ........|
(...)
Python hexdump use example:
python -m pip install hexdump
python -m hexdump file.bin
00000000: 12 01 00 02 EF 02 01 40  28 0D 04 02 00 10 01 02  .......@(.......
00000010: 03 01 12 01 00 02 EF 02  01 40 28 0D 04 02 00 10  .........@(.....
00000020: 01 02 03 01 09 02 82 00  04 01 00 80 FA 09 02 82  ................
00000030: 00 04 01 00 80 FA 09 04  00 00 02 08 06 50 07 07  .............P..
00000040: 05 82 02 40 00 00 07 05  02 02 40 00 00 09 04 03  ...@......@.....
00000050: 00 02 03 00 00 06 09 21  00 01 00 01 22 21 00 07  .......!...."!..
00000060: 05 81 03 40 00 01 07 05  01 03 40 00 01 08 0B 01  ...@......@.....
00000070: 02 02 02 01 04 09 04 01  00 01 02 02 01 04 05 24  ...............$
00000080: 00 10 01 05 24 01 03 02  04 24 02 06 05 24 06 01  ....$....$...$..
00000090: 02 07 05 83 03 10 00 20  09 04 02 00 02 0A 00 00  ....... ........
(...)
If you want to perform stock factory flashing of a Nexus device and you encounter “fastboot too old” error message, that means you need to update your local fastboot application to a newer version. One additional word would make this interesting error message self-explanatory..
I have added support for Panasonic ToughBook CF-F9 U3G GOBI2000 to FreeBSD U3G kernel module [1]. I have added firmware for Panasonic CF-F9 and HP EliteBook 2740p along with gobi_loader updates [2] that are required for 3G modems to work.
At first U3G module will create /dev/cuaU0 interface for QDL firmware load, then after successful firmware load device will reload itself to a modem mode and U3G module will provide additional /dev/cuaU0.* nodes for operations (/dev/cuaU0.2 is the AT command intarface).
In order for this modem to work on FreeBSD you also need to tune some configutation files:
attach 100 {
 match "vendor" "0x04da";  #adjust your device VID
 match "product" "0x250e"; #adjust your device PID
 action "/usr/local/sbin/gobi_loader -2000 /dev/cuaU0 /boot/firmware/gobi/";
};
default:
 set log Phase Chat LCP IPCP CCP tun command
 ident user-ppp VERSION
 set device /dev/cuaU0.2
 set phone *99\#
 set redial 5 10
 set speed 115200
 set dial "ABORT BUSY ABORT NO\\sCARRIER TIMEOUT 5 \
           \"\" AT AT-OK-AT ATH OK ATZ OK ATE1Q0 OK \
           AT+CFUN=1 OK-AT-OK \
           AT+CPIN? READY-AT+CPIN=\"YOUR_PIN_HERE\"-OK \
           AT+CGDCONT=1,\\\"ip\\\",\\\"internet\\\" OK \
           \\dATDT\\T TIMEOUT 40 CONNECT"
 set timeout 20
 enable dns
 set ifaddr 10.0.0.1/0 10.0.0.2/0 255.255.255.255 0.0.0.0
 add default HISADDR
You now should be able to use your 3G modem connection with ppp -ddial, after you add your local user to the dialer group with pw groupmod dialer -m your_user_name. Remember to have U3G compiled in. Enjoy the Internets! :-)
[1] https://github.com/freebsd/freebsd/pull/115
[2] https://github.com/cederom/gobi_loader
If you wonder to use Docker [1] or Travis CI [2] for build test or more advanced automation, note that these are Linux [3] only solutions and will not work with other operating systems such as FreeBSD [4]. You may want to take a look at old good Jenkins [5] for wider application possibilities :-)
[1] https://www.docker.com/
[2] https://travis-ci.org/
[3] https://www.linux.com/
[4] https://www.freebsd.org/
[5] https://jenkins.io/
I just did a self-assembly of JTAGulator. This simple and amazing device indeed works and shortens JTAG pinout search from days to seconds. AMAZING! I have some spare devices to sale cheap in EU, if you want one let me know! :-)
JTAGulator is an open source hardware tool, created by Joe Grand / Grand Idea Studio, that assists in identifying OCD connections from test points, vias, or component pads on a target device. All you need is a target device, bunch of tap wires / cables, USB-Mini cable, and serial terminal to operate JTAGulator.
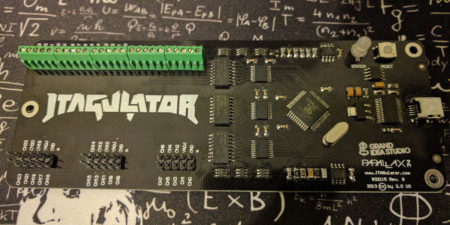

On-chip debug (OCD) interfaces can provide chip-level control of a target device and are a primary vector used by engineers, researchers, and hackers to extract program code or data, modify memory contents, or affect device operation on-the-fly. Depending on the complexity of the target device, manually locating available OCD connections can be a difficult and time consuming task, sometimes requiring physical destruction or modification of the device.
Sometimes you need to perform a network installation (i.e. when no USB or DVD drive is allowed to boot, but you can boot PXE). In case of FreeBSD you can use DNSMASQ to serve the DHCP that will assign the initial client address and configuration along with PXE boot image served over tFTP. At this point you will have bootloader running, so you can serve filesystem over NFS to obtain working environment and/or the installer..
/usr/local/tftp/FreeBSD
cd /usr/local/tftp/FreeBSD
wget http://(..)/file.iso
7z x file.iso
/usr/local/tftp/FreeBSD -ro -alldirs -network 192.168.0.0
pkg install dnsmasq
enable-tftp tftp-root=/usr/local/tftp/FreeBSD dhcp-range=192.168.0.50,192.168.0.60,255.255.255.0,1h dhcp-boot=boot/pxeboot dhcp-option=option:router,dhcp-option=option:root-path,/usr/local/tftp/FreeBSD
service nfsd onerestart
service dnsmasq onerestart
showmount -a
PXE Boot always use initial DHCP/tFTP to fetch configuration and bootloader, so the first stage is similar and should work with other Operating Systems and Bootloaders as well, the rest is up to bootloader itself..
If you want to install additional Python [1] modules inside your Blender [2] environment, you can install PIP using this recommended script [3], then use PIP to install all modules that you want. Note Blender’s Python Virtualenv location is /path_to_blender/blender_version/python/bin/python and you need to use this particular interpreter to launch the script.
[1] https://www.python.org/
[2] https://www.blender.org/
[3] https://pip.pypa.io/en/stable/installing/
Blender 3D can work with DualShock4 Playstation4 wireless controller over Bluetooth [1].
Use advanced features of your Synaptics Trackpad on a laptop running FreeBSD [1] with:
hw.psm.synaptics_support="1"
moused_enable="YES"
Section "InputDevice"
    Identifier      "Mouse0"
    Driver          "mouse"
    Option          "Protocol"      "auto"
    Option          "Device"        "/dev/sysmouse"
    Option          "ZAxisMapping"  "4 5 6 7"
EndSection
If you want to have “MacBook” like two-finger scrolling along with other parameters you can set in /etc/sysctl.conf:
hw.psm.synaptics.min_pressure=16
hw.psm.synaptics.max_pressure=220
hw.psm.synaptics.max_width=10

hw.psm.synaptics.vscroll_hor_area=1300
hw.psm.synaptics.vscroll_ver_area=-600
hw.psm.synaptics.vscroll_min_delta=50
hw.psm.synaptics.vscroll_div_min=100
hw.psm.synaptics.vscroll_div_max=150

hw.psm.synaptics.weight_current=3
hw.psm.synaptics.weight_previous=6
hw.psm.synaptics.weight_previous_na=20
hw.psm.synaptics.weight_len_squared=2000

hw.psm.synaptics.div_min=9
hw.psm.synaptics.div_max=17
hw.psm.synaptics.div_max_na=30
hw.psm.synaptics.div_len=100

hw.psm.synaptics.margin_top=200
hw.psm.synaptics.margin_right=200
hw.psm.synaptics.margin_bottom=200
hw.psm.synaptics.margin_left=200

hw.psm.synaptics.window_min=4
hw.psm.synaptics.window_max=10
hw.psm.synaptics.multiplicator=10000
If you want to use NTFS volumes on FreeBSD [1], you need to use FUSE infrastructure andNTFS-3G [2] port. Syntax of fstab is a bit differen in this case:
/dev/ntfs_partition /mnt/ntfs_mounpoint fuse rw,locale=pl_PL.UTF8,mountprog=/usr/local/bin/ntfs-3g 0 0
Also remember to put fuse_load=”YES” in /boot/loader.conf and install the sysutils/fusefs-ntfs port. Do not use hibernated volumes.
[1] https://www.freebsd.org
[2] https://www.freshports.org/sysutils/fusefs-ntfs
If you happen to get a nice laptop with a powerful graphics card, such as polish HYPERBOOK SL502VR [1], it is highly probable that you will use UEFI boot mode. In that case you need to use SCFB [2] driver instead of VESA. Use the xf86-video-scfb package to get Xorg running.
Hybrid Graphics at first used MUX device that did a LCD connect to a selected video card on boot. Nowadays both cards use common Video Framebuffer [3] to draw over a screen. The simple video card (Intel in my case) is always active, while the more powerful and power consuming video card is started on-demand (nVidia in my case). This however requires a dedicated DMA BUF implementation, which is not yet available on FreeBSD, so none of the cards can see any monitor connected, resulting in “No Screens Found Error” from Xorg.
I have already reported a bug/feature request to nVidia. Also developers of FreeBSD are working on the Hybrid Graphics implementation.
[1] http://sklep.hyperbook.pl/hyperbook-sl502-vr-p651rp6g-gtx-1060-p-25965.html
[2] https://wiki.freebsd.org/Graphics/SCFB
[3] https://en.wikipedia.org/wiki/Framebuffer
Google Chromecast is a device that allows you to stream audio-video content over WiFi network from Application to a HDMI enabled display. This works really nice when you want to watch Netflix or show some movies from your mobile device on large screen TV/Projector.
Recently, Google released a new line of Chromecast devices that support audio only and higher resolution displays, renaming Chromecast to Google Home. This rebrand also replaced mobile application for devices management. New application forces user to have working internet connection, use localization, and sign with google account in order to work. There is no way to roll back to old application. Not really cool.
I have found and reported one nasty bug in this new Google Home application (version 1.19.29), that prevents you from discovering and setting up old Chromecast devices after Factory Defaults Reset or WiFi password change (so it can connect to your WiFi again). I only have old device so I am not sure how this affects new devices. You will not be able to discover your Chromecast device over WiFi when Localization Services are disabled and according permission was not granted!! In order to connect to your Chromecast:
I hope this has nothing to do with killing old line of devices with a software update. I also hope Google will fix this issue in next releases and they really don’t force users to give up so many personal information (why do they need GPS/Bluetooth running for a simple WiFi connection otherwise)..